Bulk Add Monitors via Apps Script
This guide explains how to use Google Sheets and Apps Script to bulk add HTTP and Browser Monitors. You can enter monitor details in a structured spreadsheet and use a script to send API requests for each monitor.
You can find an example spreadsheet and Google Apps Script here and try it out right away. Note that you'll need to set the API Key and App ID within the spreadsheet using your SC account.
Refer to this link to learn how to get your App ID and API key.
Prerequisites
- A Google account
- A Sematext account with API access
- Sematext Synthetics App must be created within your Sematext Account
- A Google Sheet to store monitor details
- Google Apps Script extension
Setting Up the Google Sheet to Bulk Add Monitors
- Create a new Google Sheet.
- Add rows for each monitor as follows:
| Monitor Name | URL |
|---|---|
| bulk add 1 | https://example_1.com |
| bulk add 3 | https://example_3.com |
You can add as many monitors as your selected plan allows. For more details, refer to the pricing page. To keep this example simple, we'll demonstrate bulk adding of only two monitors.
- Proceed to Extensions → Apps Script to paste the script that will bulk add monitors.
In the Apps Script, we'll write a function called sendMultipleMonitorRequests to iterate through all the monitors in the Google Sheet and bulk add HTTP monitors.
If you want to bulk add Browser monitors, follow these steps first, but refer to the Bulk Add Browser Monitors section for the minor changes needed to create Browser monitors.
We’ll explain each line in this guide, but in the end, your function will look like this:
function sendMultipleMonitorRequests() {
  var sheet = SpreadsheetApp.getActiveSpreadsheet().getActiveSheet();
  var appId = YOUR_APP_ID;
  var apiKey = "YOUR_API_KEY";

  var endpoint = "https://apps.eu.sematext.com/synthetics-api/api/apps/" + appId + "/monitors/http";
  for (var i = 2; i <= sheet.getLastRow(); i++) {
    var name = String(sheet.getRange(i, 1).getValue()).trim();
    var url = String(sheet.getRange(i, 2).getValue()).trim();

    if (!name || !url) {
      Logger.log("Skipping row " + i + " due to missing data.");
      continue;
    }

    if (!url.startsWith("http://") && !url.startsWith("https://")) {
      Logger.log("ERROR at row " + i + ": Invalid URL format.");
      continue;
    }

    // Define the configuration parameters for creating an HTTP monitor.
    var payload = {
      "name": name,
      "interval": "5m",
      "enabled": true,
      "locations": [1, 2],
      "url": url,
      "method": "GET",
      "conditions": [
        { "id": 1, "type": "ERROR", "operator": "=", "value": "", "enabled": true },
        { "id": 2, "type": "RESPONSE_CODE", "operator": "=", "value": "200", "enabled": true },
        { "id": 3, "type": "METRIC", "key": "synthetics.time.response", "operator": "<", "value": "20000", "enabled": true }
      ]
    };

    var options = {
      "method": "post",
      "headers": {
        "Authorization": "apiKey " + apiKey,
        "Content-Type": "application/json"
      },
      "payload": JSON.stringify(payload),
      "muteHttpExceptions": true
    };


    var response = UrlFetchApp.fetch(endpoint, options);
    Logger.log("Response for row " + i + ": " + response.getContentText());
  }
}
Step-by-Step Guide for the Apps Script
- Get the sheet to extract monitor names and URLs from the first row. Then set the
appIdandapiKey:
var sheet = SpreadsheetApp.getActiveSpreadsheet().getActiveSheet();
var appId = YOUR_APP_ID;
var apiKey = "YOUR_API_KEY";
- Set the endpoint with
appIdparameter:
EU region:
US region:
- Iterate through all rows in the Google Sheet and send a create HTTP monitor request for each monitor:for (var i = 2; i <= sheet.getLastRow(); i++) {
var name = String(sheet.getRange(i, 1).getValue()).trim();
var url = String(sheet.getRange(i, 2).getValue()).trim();
// Validate the monitor name and URL; skip if invalid.
if (!name || !url) {
Logger.log("Skipping row " + i + " due to missing data.");
continue;
}
if (!url.startsWith("http://") && !url.startsWith("https://")) {
Logger.log("ERROR at row " + i + ": Invalid URL format.");
continue;
}
// Define the configuration parameters for creating an HTTP monitor.
var payload = {
"name": name,
"interval": "5m",
"enabled": true,
"locations": [1, 2],
"url": url,
"method": "GET",
"maxRetries": 2,
"headers": [
{
"name": "Authorization",
"value": "pr-env-key"
}
],
"conditions": [
{ "id": 1, "type": "ERROR", "operator": "=", "value": "", "enabled": true },
{ "id": 2, "type": "RESPONSE_CODE", "operator": "=", "value": "200", "enabled": true },
{ "id": 3, "type": "METRIC", "key": "synthetics.time.response", "operator": "<", "value": "20000", "enabled": true }
],
"monitorSSLExpiry": true,
"monitorSSLChange": true,
"allowInsecureSSL": false,
"alertRule": {
"schedule": [
{
"day": "Monday",
"index": 2,
"label": "MON",
"intervals": [],
"type": "ACTIVE"
},
{
"day": "Tuesday",
"index": 3,
"label": "TUE",
"intervals": [],
"type": "ACTIVE"
},
{
"day": "Wednesday",
"index": 4,
"label": "WED",
"intervals": [],
"type": "ACTIVE"
},
{
"day": "Thursday",
"index": 5,
"label": "THU",
"intervals": [
{
"start": "14:30",
"end": "15:00"
}
],
"type": "CUSTOM"
},
{
"day": "Friday",
"index": 6,
"label": "FRI",
"intervals": [],
"type": "INACTIVE"
},
{
"day": "Saturday",
"index": 7,
"label": "SAT",
"intervals": [],
"type": "ACTIVE"
},
{
"day": "Sunday",
"index": 1,
"label": "SUN",
"intervals": [],
"type": "ACTIVE"
}
],
"priority": "ERROR",
"minDelayBetweenNotificationsInMinutes": "2",
"backToNormalNeeded": true,
"failedRunCountToAlert": 1,
"notificationsEnabled": true,
"useOnlyAlertRuleIntegrations": false
}
};
var options = {
"method": "post",
"headers": {
"Authorization": "apiKey " + apiKey,
"Content-Type": "application/json"
},
"payload": JSON.stringify(payload),
"muteHttpExceptions": true
};
var response = UrlFetchApp.fetch(endpoint, options);
Logger.log("Response for row " + i + ": " + response.getContentText());
}
You can also bulk add monitors with private locations. Refer to the Private Locations page to learn how to set up a private location.
Getting the Private Location ID
After adding a private location, you need to retrieve its ID to include it in the bulk add monitors request payload.
To get the private location ID:
- Create a sample monitor that runs in the private location.
- Retrieve the list of monitors for that App using the API by following these instructions.
- In the API response, locate the locations field. The private location ID will be listed alongside its name.
{
  "success": true,
  "data": [
    {
      "id": 11281,
      "name": "test",
      "appName": "",
      "interval": "15m",
      "intervalInSeconds": 900,
      "enabled": true,
      "createdAt": 1742978286000,
      "locations": {
        "1": "N. Virginia, USA",
        "102": "My Private Location"
      },
      "lastScheduledAt": 1742978289000,
      "status": "NOT_AVAILABLE",
      "appId": 32992,
      "type": "HTTP",
      "conditions": [
        {
          "id": 28682,
          "type": "ERROR",
          "value": "",
          "operator": "=",
          "enabled": true
        },
        {
          "id": 28683,
          "type": "RESPONSE_CODE",
          "value": "200",
          "operator": "=",
          "enabled": true
        },
        {
          "id": 28684,
          "type": "METRIC",
          "key": "synthetics.time.response",
          "value": "20000",
          "operator": "<",
          "enabled": true
        }
      ],
      "maxRetries": 1,
      "vercelProjectId": "",
      "scheduledPauses": null,
      "isCICD": false
    }
  ]
}
In this response, "102": "My Private Location" indicates that 102 is the private location ID.
Copy the private location ID and include it in the locations array of your bulk add monitors request payload. You can delete the sample monitor after retrieving the location ID if needed.
Example Only with Required Parameters
The full example above includes all possible parameters, but some are optional. If not sent, default values will be configured. The required parameters are:
- Monitor name
- Interval
- Enabled status
- Locations
- URL
- Method
- Conditions
The payload with only the required parameters will look like this:
var payload = {
      "name": name,
      "interval": "5m",
      "enabled": true,
      "locations": [1, 2],
      "url": url,
      "method": "GET",
      "conditions": [
        { "id": 1, "type": "ERROR", "operator": "=", "value": "", "enabled": true },
        { "id": 2, "type": "RESPONSE_CODE", "operator": "=", "value": "200", "enabled": true },
        { "id": 3, "type": "METRIC", "key": "synthetics.time.response", "operator": "<", "value": "20000", "enabled": true }
      ]
    };
For more details on all available parameters for HTTP monitors, refer to the Sematext Synthetics API documentation.
Adding more dynamic parameters
In the example above, all configuration parameters were the same for each monitor, except for the URL and monitor name, which we fetched from the Google Sheet. If you want to specify different parameters for each monitor, you should add a column for each setting in the Google Sheet. In the example below, we've configured the location and interval settings differently for each monitor.
| Monitor Name | URL | Locations | Interval |
|---|---|---|---|
| bulk add 1 | https://example_1.com | 1, 2 | 5 |
| bulk add 3 | https://example_3.com | 3, 4 | 10 |
When iterating through each monitor, extract the location and interval settings for that specific monitor and add them as parameters in the payload.
for (var i = 2; i <= sheet.getLastRow(); i++) {
    var name = String(sheet.getRange(i, 1).getValue()).trim();
    var url = String(sheet.getRange(i, 2).getValue()).trim();
    var locations = String(sheet.getRange(i, 3).getValue()).trim();
    var intervalValue = String(sheet.getRange(i, 4).getValue()).trim();
    var interval = intervalValue + "m"; // Add "m" to interval

    // Convert locations from "1, 2, 3" to [1, 2, 3]
    var locationArray = locations.split(",").map(function(loc) {
      return parseInt(loc.trim(), 10);
    }).filter(function(num) {
      return !isNaN(num);
    });

    if (!name || !url) {
      Logger.log("Skipping row " + i + " due to missing data.");
      continue;
    }
    if (!url.startsWith("http://") && !url.startsWith("https://")) {
      Logger.log("ERROR at row " + i + ": Invalid URL format.");
      continue;
    }
    // Define the configuration parameters for creating an HTTP monitor.
    var payload = {
      "name": name,
      "interval": interval,
      "enabled": true,
      "locations": locationArray,
      "url": url,
      "method": "GET",
...
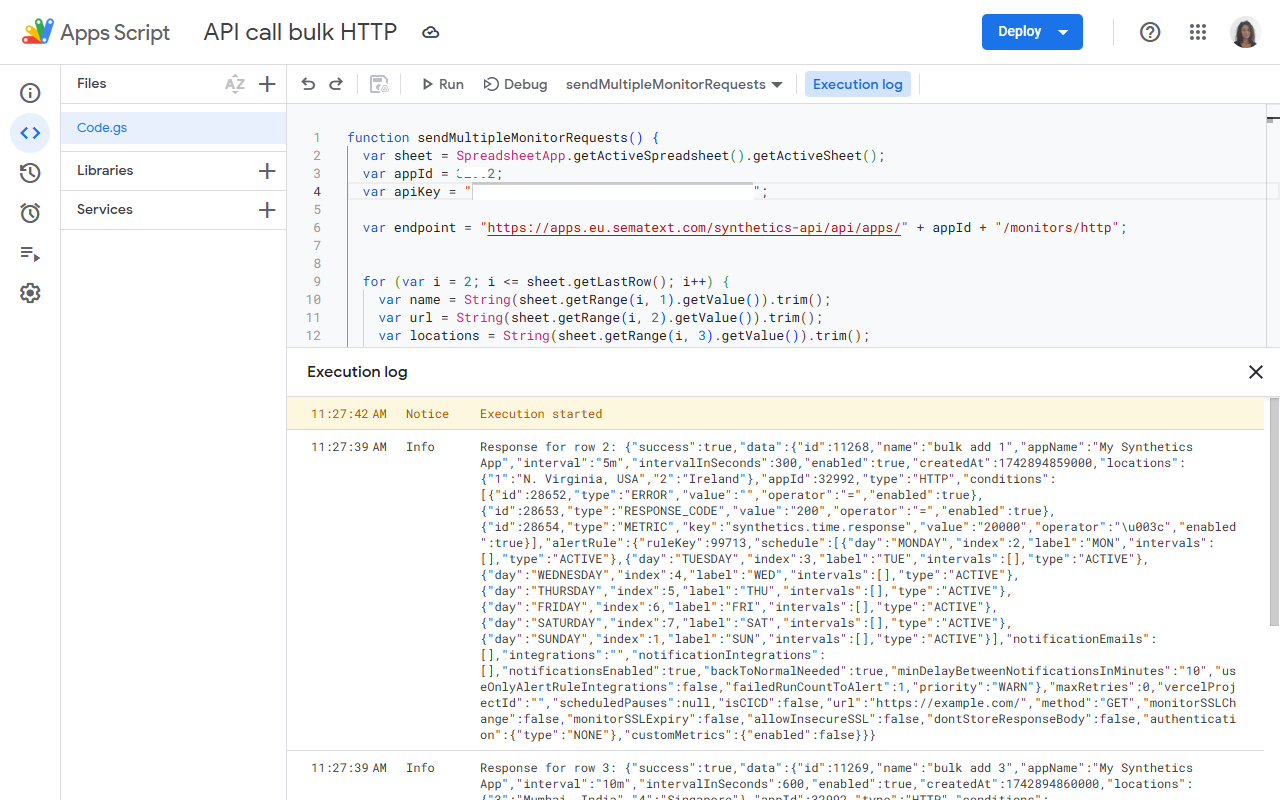
Run Apps Script
After creating your Google Sheet and writing the Apps Script based on your requirements, click Run to create the monitors. You will see the execution log below.
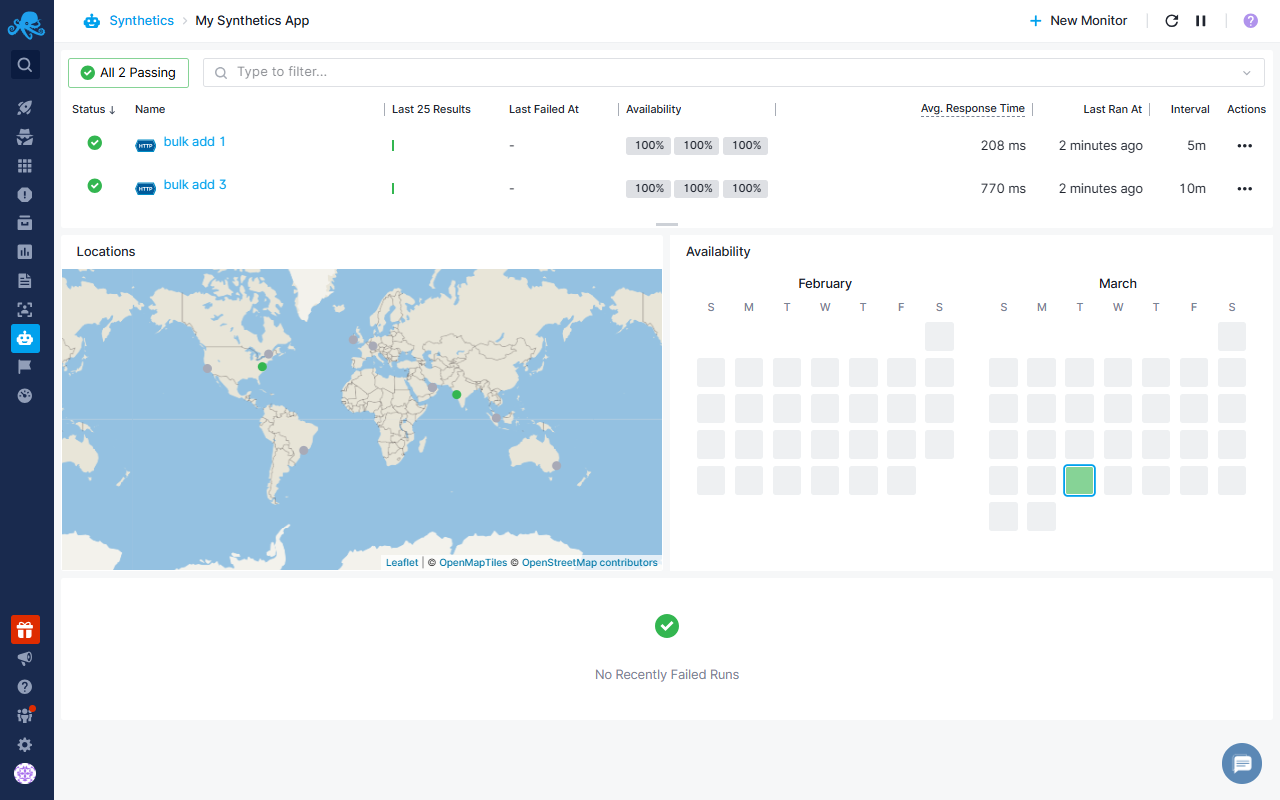
Then, go to your Sematext → Synthetics App, where you should see the HTTP monitors created in your Sematext account.
Bulk Add Browser Monitors
In the examples above, we bulk added HTTP monitors. You can follow the same steps to bulk add Browser monitors with minor changes in the Apps Script.
The endpoint must be changed from HTTP to Browser.
Bulk Add Browser Monitors endpoint:
EU region:
var endpoint = "https://apps.eu.sematext.com/synthetics-api/api/apps/" + appId + "/monitors/browser";
US region:
And, you must add "isPlaywright": true within your payload.
 var payload = {
      "name": name,
      "interval": "5m",
      "enabled": true,
      "locations": [1, 2],
      "url": url,
      "method": method,
      "isPlaywright": true,
...
Adjust the payload based on your needs to configure your Browser Monitors and then Run the Apps Script. For more details on all available parameters for Browser monitors, refer to the Sematext Synthetics API documentation.
Bulk Add Script Based Browser Monitors
If you want to create script-based Browser monitors, replace the URL column in your spreadsheet with the Script column. Paste your user journey script written in Playwright into that new column for each monitor.
| Monitor Name | Script |
|---|---|
| bulk add 1 | async function testPage(page) { await page.goto("www.google.com"); await page.screenshot({ path: 'screenshot.jpg' }); } export default testPage; |
| bulk add 3 | async function testPage(page) { await page.goto("www.google.com"); await page.screenshot({ path: 'screenshot.jpg' }); } export default testPage; |
Then instead of extracting a URL within the App Script extract user journey scripts
  for (var i = 2; i <= sheet.getLastRow(); i++) {
    var name = String(sheet.getRange(i, 1).getValue()).trim();
    var script = String(sheet.getRange(i, 2).getValue()).trim();
Then, within your payload, remove the url parameter and add two new configuration parameters: scriptBased: true and script.