Installation
This page will show you how to set up the Sematext Synthetics CI/CD integration with your CI/CD pipeline. To learn more about the features included in the integration, head over to its overview page.
Prerequisites
Before you begin, make sure you have the following:
- A Synthetics App in Sematext Cloud to create and manage monitors
- Don't worry about creating monitors just yet; simply have the App ready, and we'll guide you step by step on how to create a CI/CD Monitor
- A GitHub repository where you wish to run CI/CD Monitors
- You'll need Admin permissions on the repository to access the settings and add repository secrets
Once you have these prerequisites ready, we can start by creating CI/CD Monitors in Sematext Cloud.
Creating CI/CD Monitors and a CI/CD Group
Now that the prerequisites are taken care of, you can proceed with the rest of the setup that takes place within the Sematext Cloud UI. You'll need to create some CI/CD Monitors and assign them to a CI/CD Group which will be invoked from your CI/CD pipeline.
Choosing a monitor type
When creating a Synthetics monitor, you'll see that there's an option to designate that monitor as a CI/CD Monitor.
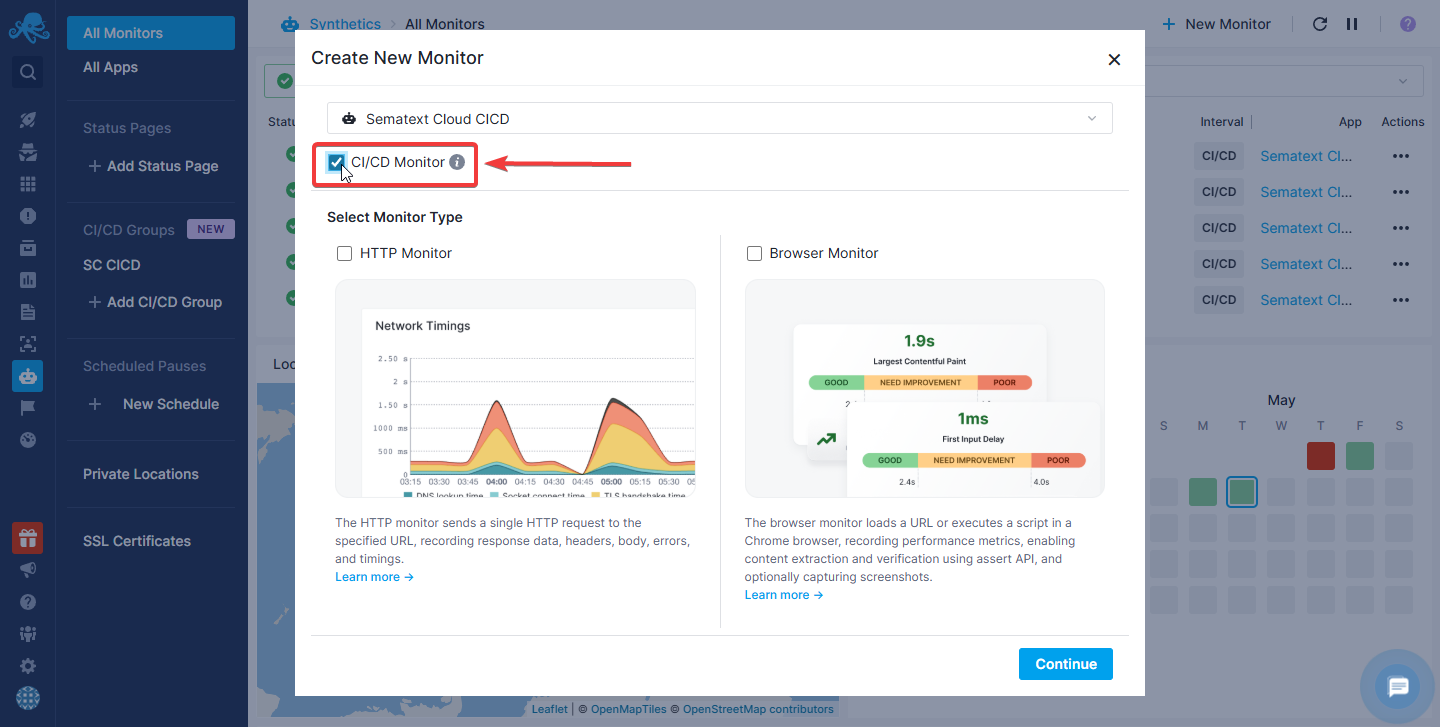
You can also convert your existing HTTP or Browser Monitors to CI/CD monitors and add them to CI/CD Groups later. To do this, go to the monitor's Edit Monitor screen and toggle the CI/CD Monitor option in the General tab.
Use HTTP Monitors for simple availability and performance checks, or Browser Monitors for more complex User Journeys, including multi-step scripts and resource usage monitoring. This flexibility allows you to test anything from a single API endpoint to a full login and checkout flow.
Configuring the monitors
Configuring CI/CD Monitors follows a similar process to regular monitors, with one major difference - how the URL is configured.
Configuring the URL
While creating a monitor, you'll be prompted to enter a URL. You can either use a static URL (if you only want to monitor one specific testing environment) like for regular monitors, or the Dynamic URL feature unique to CI/CD Monitors if you'll be monitoring multiple preview environments with different URLs.
For example, let's say you want to monitor the health endpoint of your website example.com - located at example.com/health.
- By setting your monitor's URL to <DYNAMIC_URL>/health, you can pass the base URL of your various preview environments (such as test-12.example.com and test-17.example.com) in the test creation requests and have those tests point to the appropriate endpoint on those preview environments once the placeholder is replaced (test-12.example.com/health and test-17.example.com/health)
- On the other hand, if you only have one preview environment test-preview.example.com, then you can just use that static URL and turn off the Dynamic URL feature
Setting up Dynamic URLs
Note: Feel free to skip this step if you only want to monitor a static URL
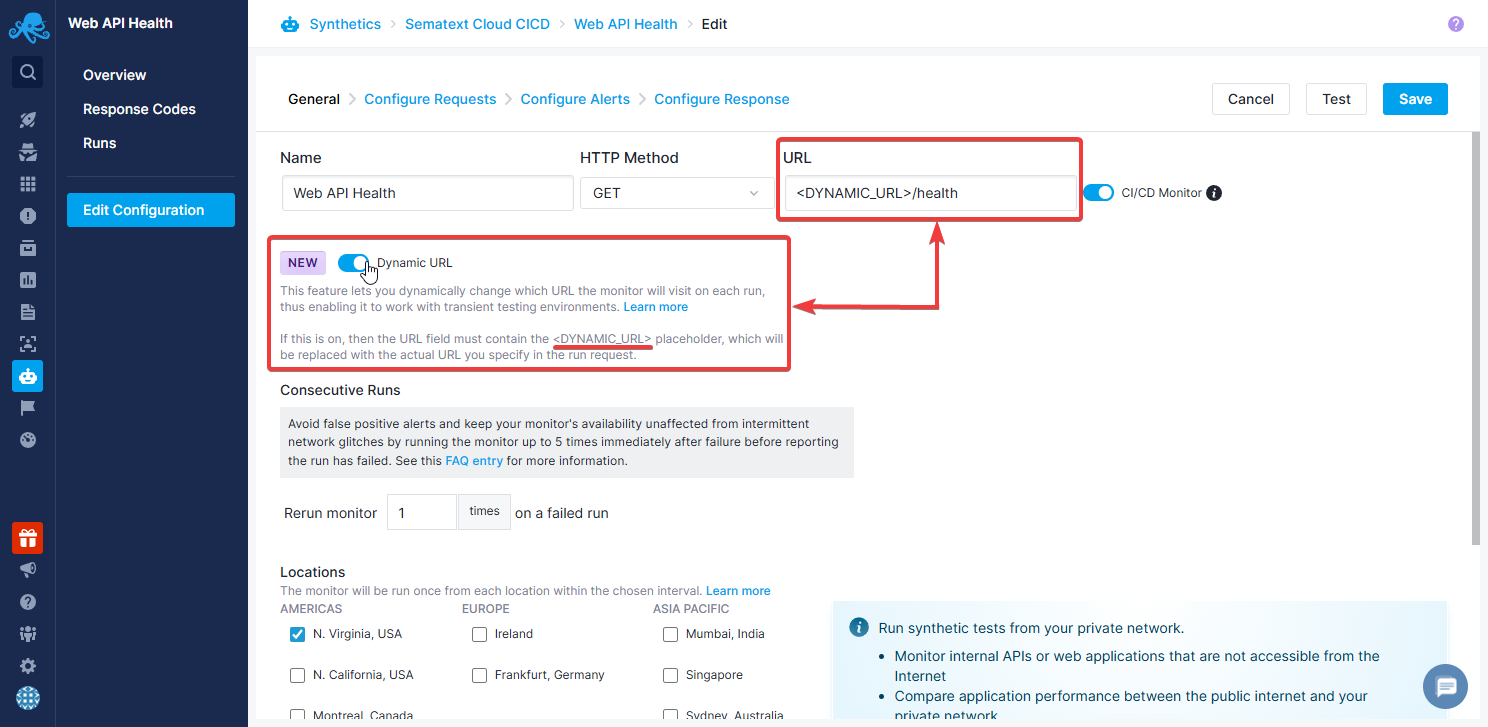
Here's where you can configure this setting for HTTP monitors. Make sure to include the <DYNAMIC_URL> placeholder in the URL, then add whatever path you need to query the specific endpoint you want to test.
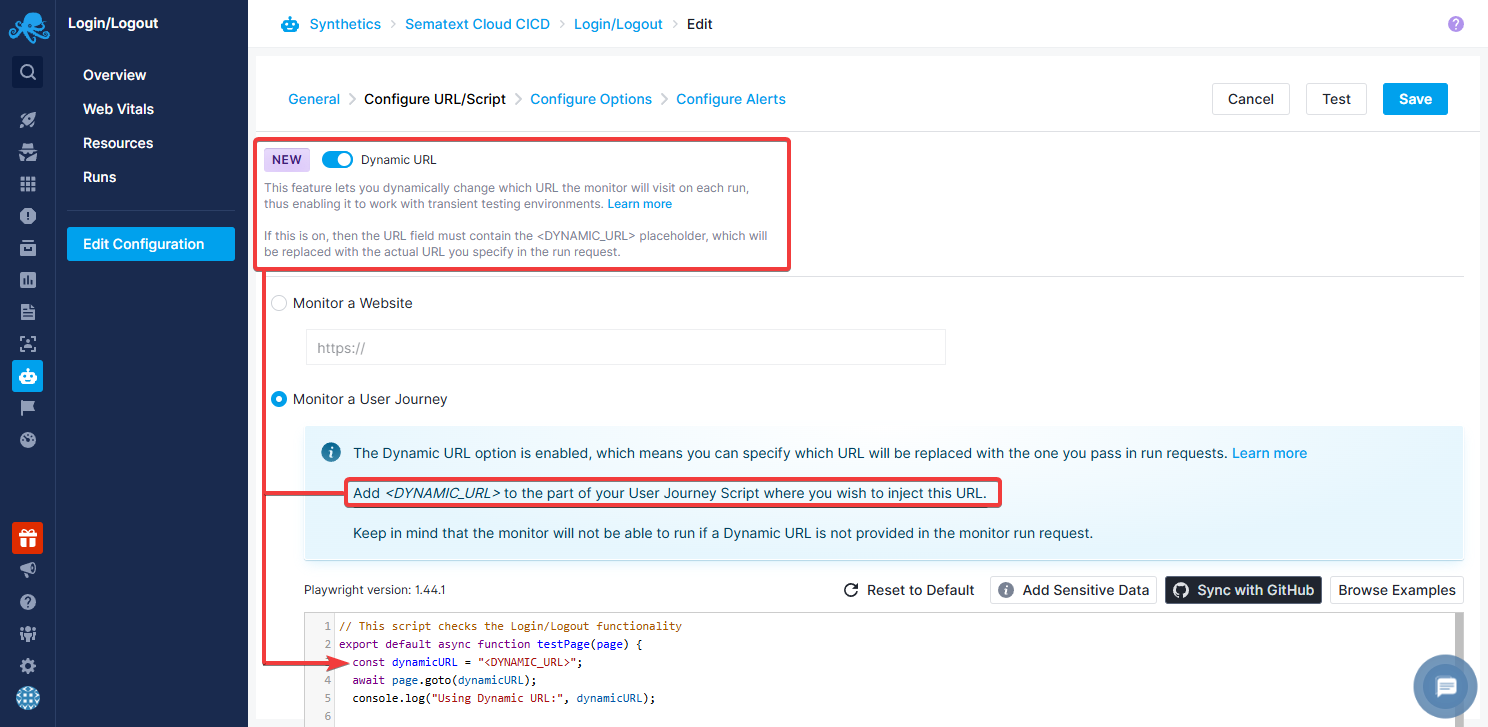
For Browser monitors, we'd just have <DYNAMIC_URL> somewhere in the script (or in the URL, if the monitor isn't configured to run a custom script), which would then get replaced with the actual URL.
Configuring other options
You'll also need to select which locations your monitor will be running from. When your CI/CD Monitor gets a run request, it will run from all the specified locations at once.
You can also configure other settings, such as certain headers, cookies, query params and various SSL settings, so feel free to tweak those as needed. Once you're done, finish editing the monitor and create as many monitors as you need for the various endpoints and User Journeys you'd like to test. After that, you can move on to creating a CI/CD Group.
Creating a CI/CD Group
When running tests for your projects, you'll most likely want to test a number of endpoints and User Journeys. To make managing and running all your CI/CD monitors easier, you can group them together using CI/CD Monitor Groups, which can be created and viewed in the Synthetics sidebar.
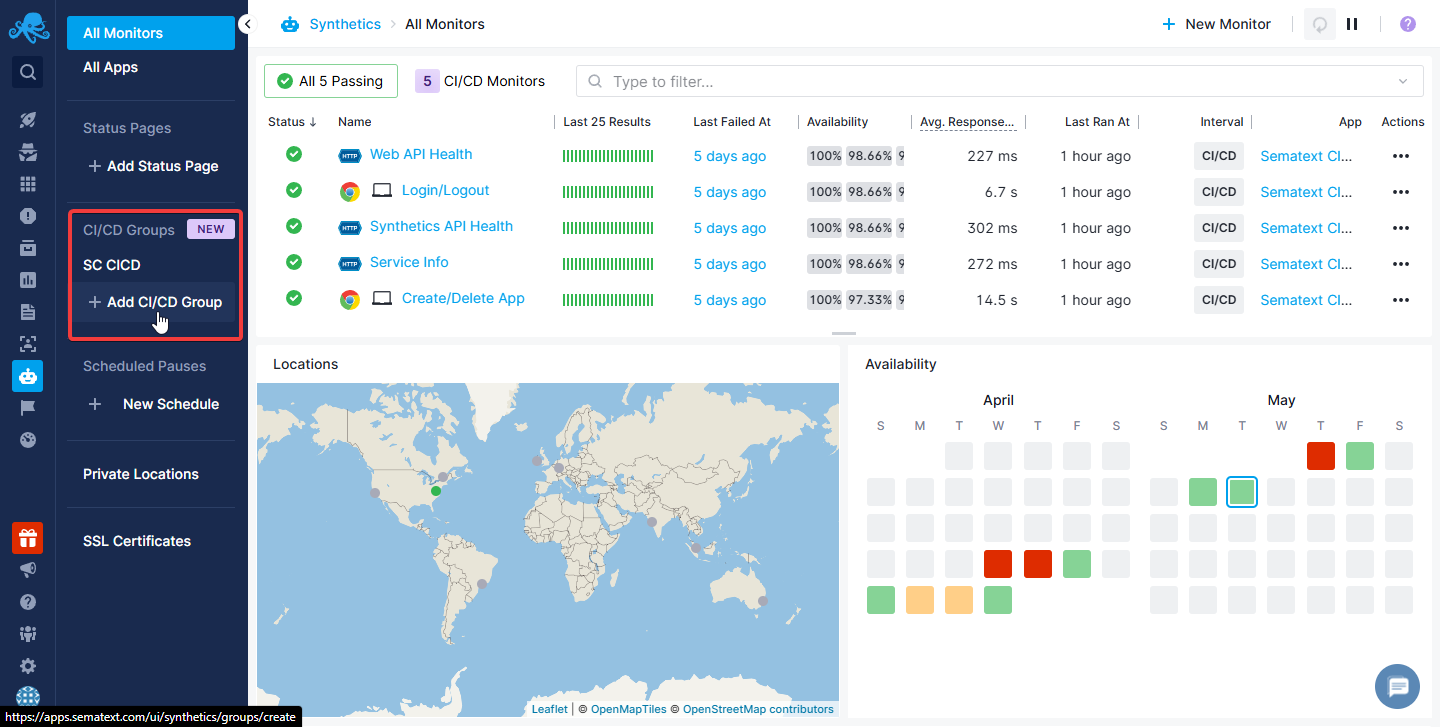
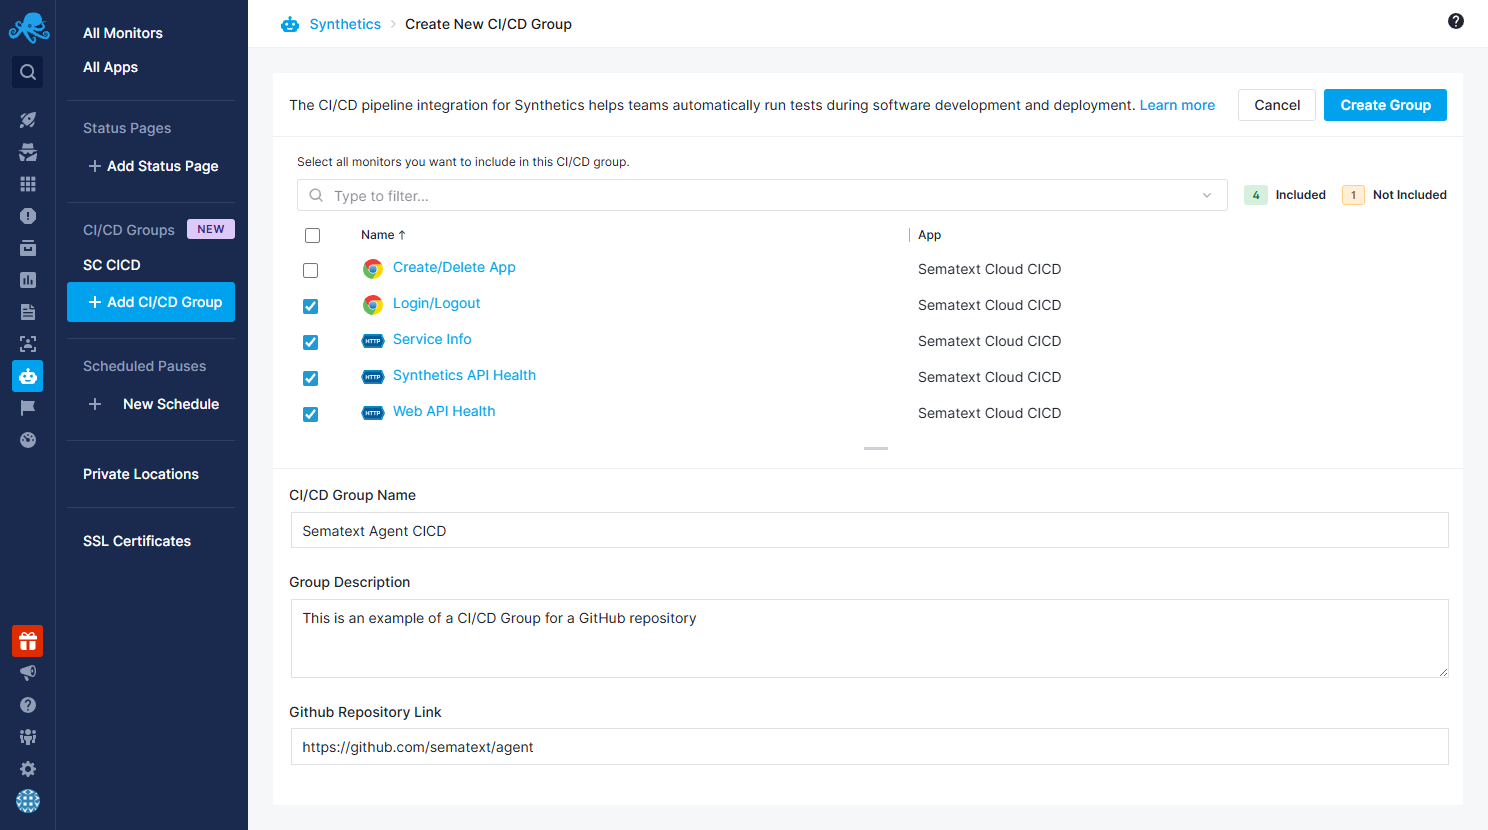
Creating a CI/CD Group is simple:
- Select which monitors you want to add
- Keep in mind that only CI/CD Monitors can be assigned to CI/CD Groups
- Assign a name to the group, which will be displayed in the sidebar
- Add a description to know what this CI/CD Group will be used for
- Add a GitHub URL to your repository, which will be used to quickly allow you to open commits and branches which were tested
After you've created a CI/CD Group, you'll need a way to trigger Group Runs within your CI/CD pipelines. To accomplish this, we've created the Sematext CI/CD GitHub Action which you can call within your GitHub workflows.
The Sematext CI/CD GitHub Action
The Sematext CI/CD GitHub Action is a straightforward way to execute a CI/CD Group Run and collect its results. To set it up, you'll need the following:
- A Sematext Cloud account with a Synthetics CI/CD Group configured
- You'll need the ID of your CI/CD Group, which you can see in the initial installation instructions when creating the group, or in the URL (for example for
https://apps.sematext.com/ui/synthetics/groups/15the ID is15)
- You'll need the ID of your CI/CD Group, which you can see in the initial installation instructions when creating the group, or in the URL (for example for
- Your Sematext Cloud account's API key
- You can copy your API key from the
Settings->APIpage in the UI, which can be found: - You then have to add the API key as a repository secret to the GitHub repository you wish to run these CI/CD monitors for.
- Go to your repository's
Settings- If you can't see the
Settingstab for your repository, then you might not have permissions to edit them - contact your repository's administrator to take care of this step
- If you can't see the
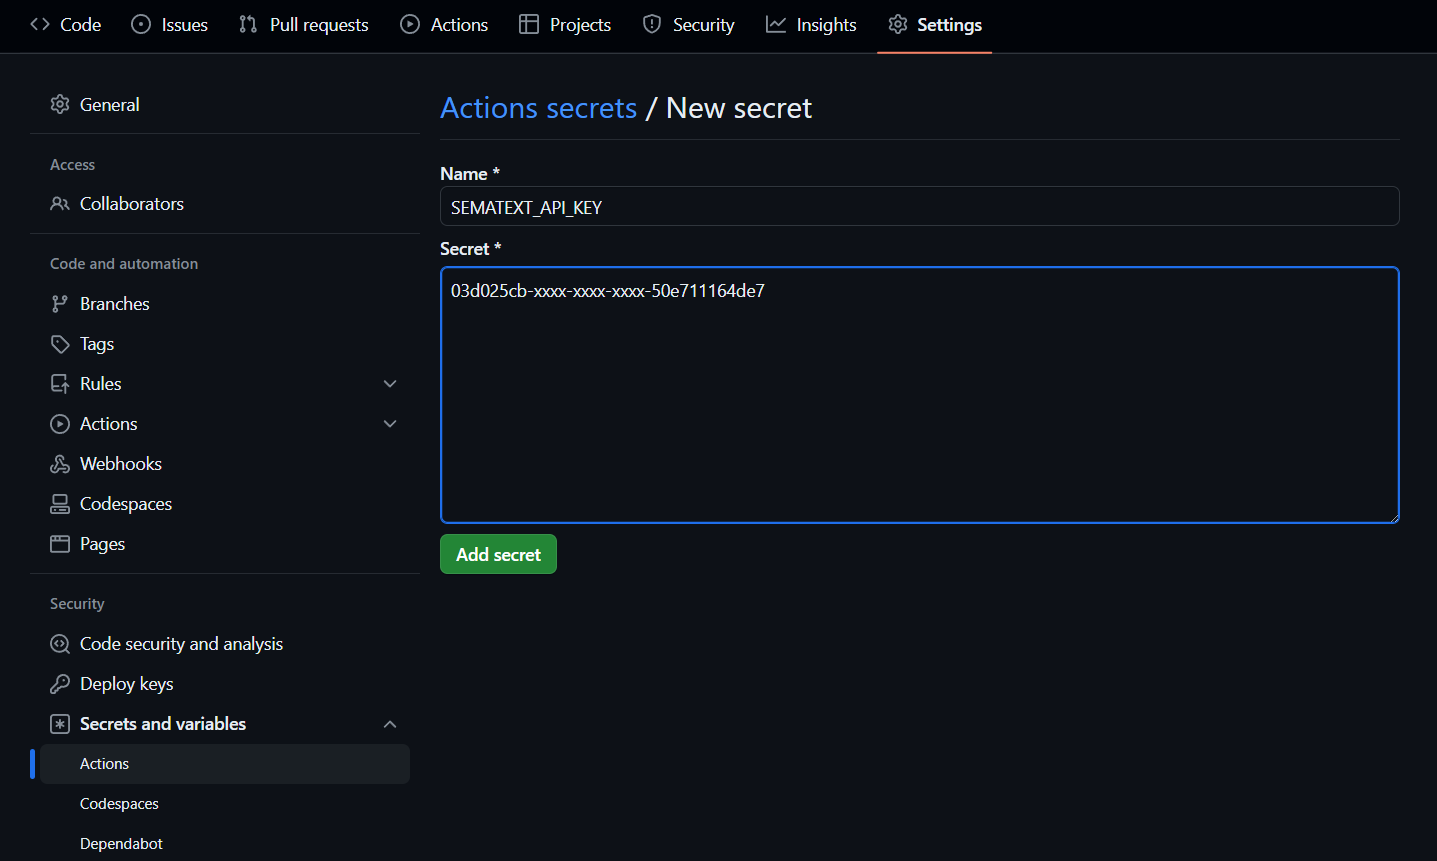
- In the sidebar under
SecurityclickSecrets and variablesand thenActions - Create a new repository secret and name it
SEMATEXT_API_KEY, then paste in your Sematext Cloud account's API key
- Go to your repository's
- You can copy your API key from the
Usage
You can simply add the following step to a GitHub Workflow file in order to trigger the Sematext CI/CD Action and invoke the monitors in the CI/CD Group which you configured.
steps:
  - name: Run Sematext Synthetics Tests
    uses: sematext/synthetics-cicd@v1.0.0
    with:
      MONITOR_GROUP_ID: 42                                          # Replace with your actual Monitor Group ID
      REGION: 'US'                                                  # Replace with your Sematext Cloud account's region('EU' or 'US')
      SEMATEXT_API_KEY: ${{ secrets.SEMATEXT_API_KEY }}             # Make sure to add your Sematext API key as a repository secret first
      TARGET_URL: 'https://your-deployment-url.com'                 # Pass dynamically from your setup, used as the replacement for <DYNAMIC_URL>
      GIT_COMMIT_HASH: '5a24a0f8cd48be7f315787dcc23ad418ecdb36f2'   # Pass dynamically from your setup
      USE_HEAD_SHA: false                                           # Set to true if the invoking event is linked to the commit you're testing
You can also check out the workflow examples for different deployment setups if you want to grab a template.
Inputs
| Input | Description | Required |
|---|---|---|
MONITOR_GROUP_ID |
The ID of the CI/CD Group which contains the tests (e.g., 42) |
Yes |
REGION |
The region where your Sematext Cloud account is registered (EU or US) |
Yes |
SEMATEXT_API_KEY |
Your Sematext Cloud account's API key | Yes |
TARGET_URL |
The URL to run the Synthetics tests against - mandatory for monitors with Dynamic URLs | No |
GIT_COMMIT_HASH |
The commit hash that the Synthetics tests will be triggered for | No |
USE_HEAD_SHA |
Whether to use the HEAD SHA for the Synthetics tests | No |
Note: Either
GIT_COMMIT_HASHmust be provided orUSE_HEAD_SHAmust be set totrue.
Outputs
| Output | Description |
|---|---|
result |
The full result output from the Synthetics Group Run |
status |
The status of the Group Run (passed or failed) |
error |
The error message if the Group Run failed |
group_run_url |
The URL of the Group Run in the Sematext Cloud UI |
Examples
These two examples illustrate how the action can be set up depending on how complex your deployment setup is: