[Note: this post was written by Sematext engineer Marko Bonaći]
Stage setting: Camera is positioned above the treetop of one of three tall poplars. It looks down on the terrace of a pub. It’s evening, but there’s still enough light to see that the terrace is sparsely populated.
Camera slowly moves down towards a specific table in the corner…
As the camera moves down, an old, crummy typewriter font appears on the screen, typing with distinct sound. It spells:
May 2015, somewhere in Germany…
The frame shows four adult males seating at the table. They sip their beers slowly, except for one of them. The camera focuses on him, as he hits a large German 1 liter pint in just two takes. On the table there’s a visible difference in the number of empty beer mugs in front of him and others. After a short silence, the heavy drinker says: (quickly, like he’s afraid that someone’s going to interrupt him, with facial expression like he’s in a confession):
“I still use grep to search through logs”.
As the sentence hit the eardrums of his buddies, a loud sound of overwhelming surprise involuntarily leaves their mouths. They notice that it made every guest turn to their table and the terrace fell into complete silence. The oldest one amongst them reacts quickly, like he wants no one to hear what he just heard, he turns towards the rest of the terrace and makes the hand waving motion, signaling that everything is fine. The sound of small talk and “excellent” German jokes once again permeates the terrace.
He, in fact, very well knew that it isn’t all fine. A burning desire to right this wrong grew somewhere deep within his chest. Camera focuses on this gentleman and starts to come increasingly closer to his chest. When it hits the chest, {FX start} the camera enters inside, beneath the ribs. We see his heart pumping wildly. Camera goes even deeper, and enters the heart’s atrium, where we see buckets of blood leaving to quickly replenish the rest of the body in this moment of great need {FX end}.
The camera frame closes to a single point in the center the screen.
A couple of weeks later, we see a middle aged Croatian in his kitchen, whistling some unrecognized song while making Nescafe Creme and a secret Croatian vitamin drink called Cedevita.
Now camera shows him sitting at his desk and focuses on his face, “en face”.
He begins to tell his story…
“It was a warm Thursday, sometime in May 2015. My first week at Sematext was coming to end. I still remember, I was doing some local, on-ramping work, nothing remotely critical, when my boss asked me to leave everything aside. He had a new and exciting project for me. He allegedly found out that even the biggest proponent of centralized log management, Sematext, hides a person who still uses SSH+grep in its ranks.
The task was to design and implement an application that would let Logsene users access their logs from the command line (L-CLI from now on). I mentioned in my Sematext job interview that, besides Apache Spark (which was to be my main responsibility), I’d like to work with Node.js, if the opportunity presented itself. And here it was…”
What is Logsene?
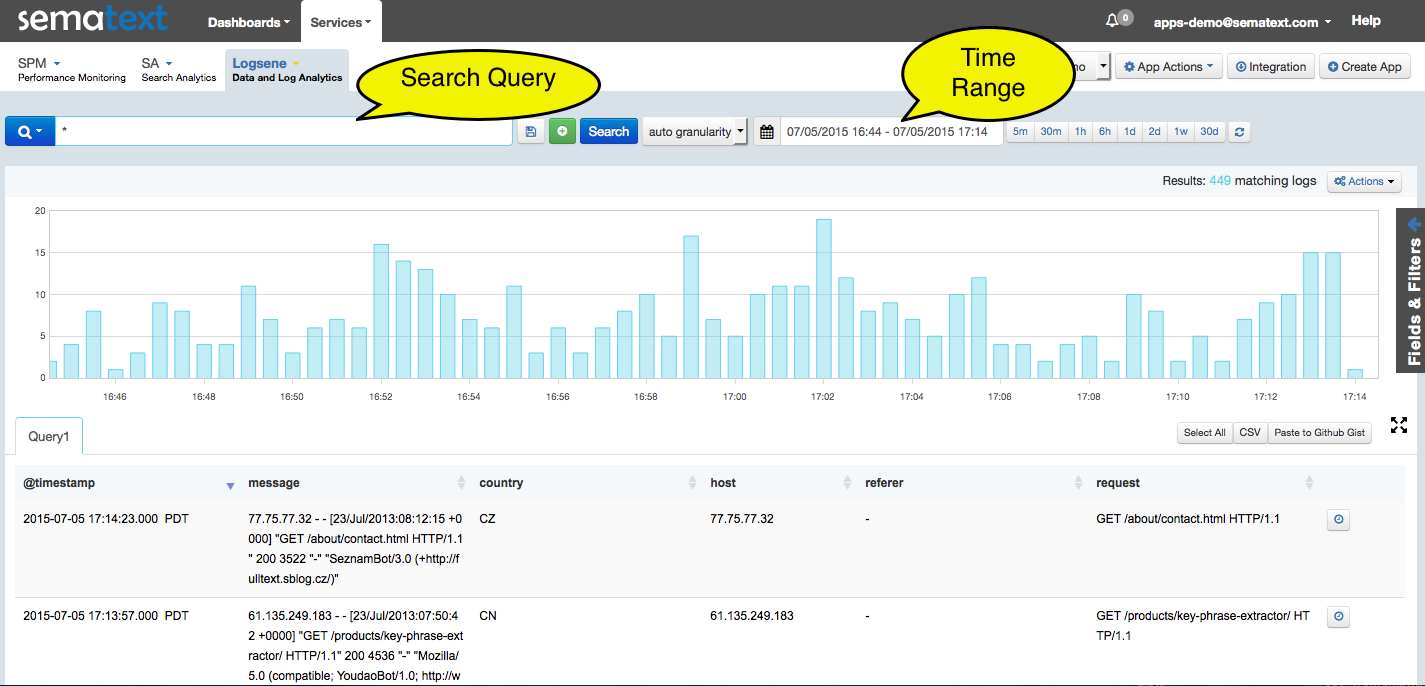
Good thing you asked. Let me give you a bit of context, in case you don’t know what Logsene is. Logsene is a web application that’s used to find your way through piles of log messages. Our customers send us huge amounts of log messages, which are then collected into one of our Elasticsearch clusters (hereinafter ES). The system (built entirely out of open source components) is basically processing logs in near-real-time, so after the logs are safely stored and indexed in ES, they are immediately visible in Logsene. Here’s what the Logsene UI looks like:
See those two large fields in the figure above? One for search query and the other for time range? Yes? Well, that was basically what my application needed to provide, only instead of web UI, users would use command-line interface.
So what was the problem? Why am I telling you all this, you might be wondering. Well, I was not exactly what you would call a Node expert at the time. I was more of a Node fanboy than anything else. I mean yes, I was following developments in the Node.js community almost from the start and I desperately wanted to work with it, but, in spite of all my “Node evangelism” at my previous workplace, I was not able to push through a single Node project, and thus I did not have any Node applications in production, and that’s how you gain the right kind of experience. I only played with it in my free time.
The Start Was Rough
On top of all that, I purchased a lovely Macbook Pro just a couple of weeks ago and having previously worked only on Windows and Ubuntu, I needed to google in order to find solutions for most trivial stuff, especially improvements I wanted to make to my development workflow.
Which IDE do I choose for developing in node? Which text editor do I use for a lighter stuff?
I previously tried Brackets and Atom and I had a feeling that they were both somehow better suited for front end stuff. I also used WebStorm previously, so I downloaded a trial version to check out what juicy improvements have been added since I last used it. None, as far as I could tell. But once I started using it, there was no going back. Though Node support could certainly be substantially better (the only Node project template in WebStorm is “Express app”).
Those were all sweet worries, and I enjoyed every step of it, but then it quickly came time to actually do something useful.
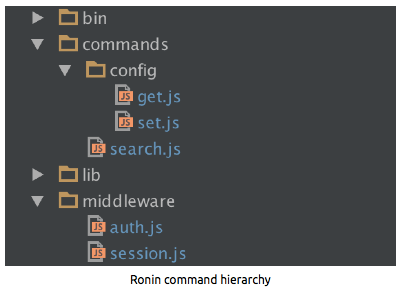
How are CLI applications even developed in Node? I found a couple of articles and one of them led me to this package called Ronin, which is like a small framework for developing CLI applications. It allows you to structure your shell commands by simply using folder hierarchy.
So, looking at the figure above, we have the following commands:
logsene search
logsene config get
logsene config set
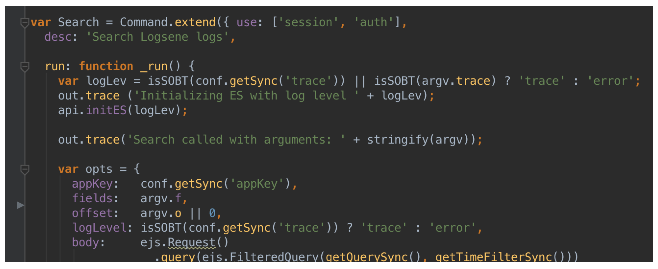
In order for a function to be considered a command, it needs to extend the base object ronin.Command, like this:
The run function is executed when the client invokes the command. In this example, logsene search would trigger the run command you see in the figure above.
Ronin also has this useful notion of a middleware, which avoids code duplication by providing a function (placed in the middleware folder) that you “use” in your command definition (the figure above shows that the search command uses two middleware functions, session and auth). All middleware functions that you “use” are going to be executed, in the order that you list them, before your command’s main, run function.
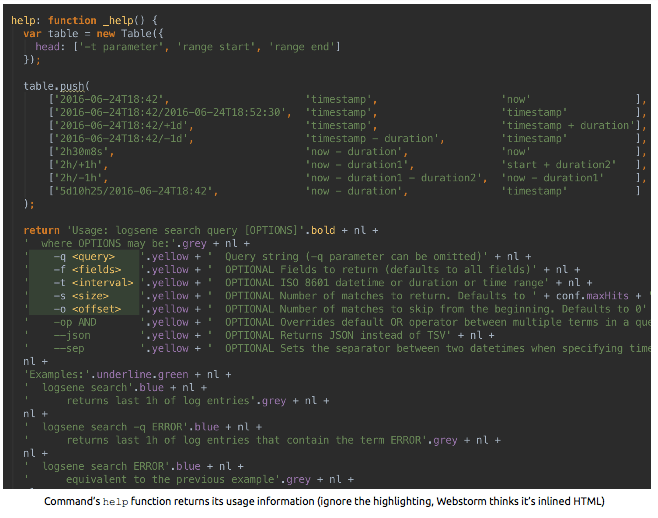
Besides the run function, there’s also a help function that is simply used to output command’s usage information (e.g. logsene search –help).
The First Setback
The first real setback I had was a feature that required that different people, using a shared OS user and a shared Sematext account at the same time, being SSHd into the same box. Many organizations, in order to simplify maintenance, have this kind of “single gateway” setup behind their firewalls.
The problem was that in order to facilitate one of the most important requirements — the ability to pipe search output to other *nix commands (e.g. grep, awk, cut, sed, tail, less, …) — each command needed to be its own, new Node process, i.e. the Node process starts and ends with a single command.
logsene search ERROR | awk '$4 ~/kern/'
[The command searches last hour (default) of logs for the term ERROR and pipes the output to awk, which prints out only those log entries that originated from the kernel.]
In other words, it wasn’t possible to use my own REPL, with my own logsene> prompt, where each user’s session would simply be bound to the duration of the node process, i.e. the REPL. In that case, handling a user session would be as simple as writing and reading environment variables. The problem is that environment variables, written from a Node process (or any other process, for that matter) live only as long as the process that wrote them lives. When the process exits, environment variables that the process created are purged from the environment.
That disqualified environment variables as the means of session persistence across multiple commands.
The whole point of the session was to spare users the trouble of logging in with each new command they execute. I needed a way to establish a session environment that would be uniquely identifiable and bound to a specific user session, from multiple, serially executed node processes, i.e. commands.
I searched far and wide through all of them: npm (what a terrible search experience), nipster (better), npmsearch, node-modules (not bad), nodejsmodules (which forces https, but doesn’t even have a proper SSL certificate), gitreview, cnpmjs and libraries.io but was not able to find anything related to my problem. I decided that, from then on, I was going to use Google (possibly sometimes nipster and node-modules) to search for packages.
The other thing that this “package searching” experience has shown is that not a single search solution out there was designed by a search engine expert (no filters, no facets, no date ranges, no combining tags with queries, not even result sorting, …). Really terrible. I hope to convince my boss that we donate some time to the Node community and put up a proper search engine. Imagine if you could search for a term and get results together with facets, which would allow you to further filter the results on author, number of dependent modules, recent usage, number of GH stars, date of the last commit, exclude packages without GH repo, …
It was a long road and in the end it again turned out that the simplest solutions are the best ones. I used the fact that all SSH sessions have unique SSH_TTY environment variable, even if the same OS user is used by different SSH sessions. So I decided to use Linux username to identify user that’s physically working at the workstation and SSH_TTY to identify SSHd users, no matter how many of them are SSHd to the box in parallel. This insight was the turning point, as it made possible to solve the whole problem with a single line of code (using configstore NPM package):
var conf = new Configstore('logsene' + (process.env.SSH_TTY || '/' + osenv.user()));Configstore is a package (used by Yeoman, amongst others) to persist information inside user’s home/.config directory, in configuration file whose relative path and name you provide as parameter.
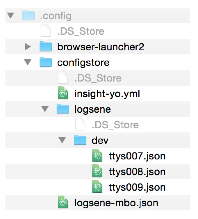
To illustrate how that works, imagine there are currently four users working with L-CLI, all using the same OSX user account, named mbo. One of them is physically sitting at the box, while other three are SSHd into it.
Looking at the Configstore command above, since user sitting at the box doesn’t have SSH_TTY environment variable, she is assigned with the following config file:
Looking at the Configstore command above, since user sitting at the box doesn’t have SSH_TTY environment variable, she is assigned with the following config file:
.config/configstore/logsene/logsene-mbo.json
Second user’s SSH_TTY environment variable is set to /dev/ttys007 so he’s assigned with:
.config/configstore/logsene/dev/ttys007.json
Analogous to the second user, third and fourth users have SSH_TTY set to /dev/ttys008 and /dev/ttys009, respectively.
So this is how it works:
- user enters search command
- L-CLI tries to locate user’s configuration file, using the method I just described
- if the file is not found or if more than 30m have passed since user’s last command:
- ask the user to login and use that information to retrieve the API key
- ask the user to choose Logsene app that she wants to work with (if the API key has more than one Logsene app) and retrieve the chosen app’s APP key
- store username, API key, APP key and session timestamp to user’s conf file
- update session timestamp
- display search results
OK, that solved the “session problem”.
Streams FTW
Ever since streams became widespread in Node, I’ve looked at them as something magical. It was unbelievable to see how a couple of pipe() functions can make the code terse and transform the way you think about your code. Streams are built on top of EventEmitter, which provides pub-sub primitives within an application. Piping is just a convenience mechanism that ties output of a readable stream (data source) to input of a writable stream (data destination) and handles all the nasty wiring and stream throttling bits for you (the latter is used to alleviate the problem that occurs when data rate from the source is faster than the processing rate of destination, so the source stream is asked to stop sending any more data until told otherwise by the destination stream).
HTTP requests (used to fetch results from the Logsene API server) are basically streams. stdout (think of it as console.log), where search results should eventually be written to, is a stream. So why would I interrupt those nice streaming interfaces with something ugly as promises in the middle? Moreover, it’s a much better experience if log entries start appearing almost immediately after you fire search, than to wait until the whole result set is buffered just to get a potentially huge output splat all over your terminal, all at once. I yelled “streams all the way down” and got to work.
Since I have never worked with streams for real before, I first needed to re-educate myself a bit. Substacks’s Stream handbook is still an excellent stream learning resource. But before starting with that, you should perhaps first go through NodeSchool Stream Adventure course.
Anyway, Logsene search API fully supports Elasticsearch client libraries, so to stream-enable the whole search experience I ended up using elasticsearch-streams package, which provides streaming facilities on top of the official elasticsearch library. You could say that the package is emulating streaming by offsetting the retrieved portion of the result set (e.g. 1-50 hits in first request, 51-100 in second, …). Unless you dug a bit deeper, you wouldn’t even notice the difference. By utilizing streams, Indexing becomes simply a writeable stream and searching, of course, a readable stream. Here I also used Dominick Tarr’s JSONStream package, that lets you manipulate streams of JSON data in the functional way. E.g. it allows you to map over JSON objects, to filter them on the fly, as they pass near you. And that’s exactly what I needed, since JSON is not a particularly useful for representing log entries to users. For that, I needed something more table-like, so I transformed JSON to TSV, following my colleague Stefan’s advice.
Right about this point, while working with streams, something clicked in my head. I cannot explain what exactly happened but somehow everything fell into place. I started feeling much more confident with Node. I mean, not that I was ever worried that I wouldn’t be able to do the job, but you know those moments when you think of a thing you still need to do (but you still don’t know how), then of another and in a matter of seconds your mental to-do list becomes so large that you cannot help feeling a bit overwhelmed. The experience had taught me that the best thing to do in those situations is to calm down, stabilize your breathing pattern and go back to your actual to-do list. Go over it and add any new things that you just thought of. Look at this as a way to better the product you’re working on, not as something that should be dwelled upon or be hindered by.
From this point on, it was a breeze. I did more in the following three days than the previous two weeks. Node has just spread out to me, ready to be gulped away. And that’s a great feeling!
OK, enough of the human story (that’s how my boss refers to my writing; either that or he just says essay instead of blog post), let’s see what this puppy can do…
-t flies
After two weeks of development I only had basic set of functionalities, where you could login and do a regular relevancy-based ES search.
At this point, my attention was drawn to the fact that normal, relevancy based search, when used by itself, doesn’t play well with log entries.
If you think about it, that actually makes sense. When a user wants to check her logs she is primarily interested in some specific time range (in fact, if a user just opens the Logsene web application, without entering a search query, she gets the last hour of logs). Only after log entries are filtered to include only some specific time range, user needs to be able to enter a query that is used against that time range. You would rarely (if ever) want to search the whole log history, but even then, you’re still speaking in time ranges.
So I needed to provide time range filtering functionality. I chose to use popular Moment.js library to help me with date-time, time duration and time range parsing.
Let me explain what I mean by date-time, duration and range:
- date-time is simply a timestamp, e.g. -t 2016-06-24T18:42:36
- duration is a length of time, represented with units of time: e.g. -t 1y8M8d8h8m8s
- range is a provisional object that has start and end timestamps
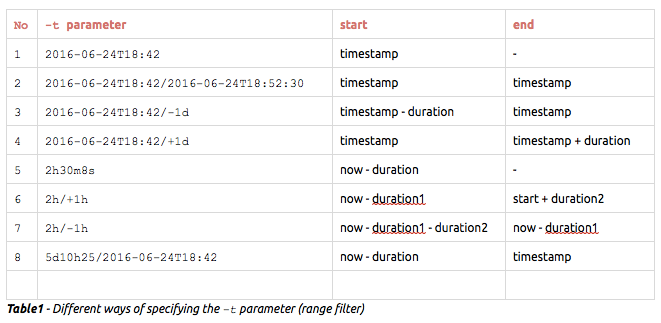
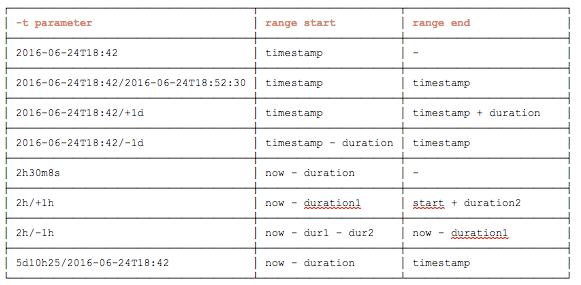
Range is what we are really after. Every -t parameter must eventually yield a date-time range. The following table shows how that calculation is done, depending on the value of the -t parameter that the user has provided.
Note that the default range separator is forward slash (standardized by ISO-8601). This can be customized with the –sep parameter.
Duration is basically a date-time modifier, which either operates on some specific date-time (i.e. timestamp) or on the current time. E.g. -t 5 will subtract 5 minutes from the current time and return all entries since the resulting date-time. It would yield a range query, which would only have gte (greater than or equal) boundary.
Also note that, when you use duration in the second position in a range expression, it has to start with either minus or plus sign that immediately follows forward slash (like in the 3rd, 4th, 6th and 7th example in the table1). That tells L-CLI whether to add duration to the start or to subtract duration from the start.
Let Me Show You a Few Examples
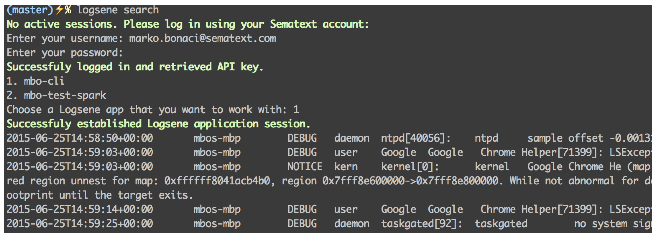
When a user issues her first L-CLI command (or if more than 30 minutes have passed since her last command), she is asked to login. After a successful login, she is prompted to choose a Logsene application that she wants to work with (if she has more than one, of course).
After that, the command is executed.
Let’s say that a user installed L-CLI and she starts it for the first time, by issuing the simplest possible command, logsene search (without any parameters). L-CLI first asks the user to log in. Upon successful login, she is asked to choose the Logsene application that she wants to query. Now L-CLI has all the prerequisites to start doing it’s main job, searching logs. Since no parameters where given, L-CLI returns the last hour of log entries (default maximum number of returned log entries is 200, which can be adjusted with the -s parameter).
logsene search
When a live session exists, L-CLI already has all required user’s information, so there’s no need to login:
logsene search
To turn on tracing (used only for troubleshooting, since it messes up the TSV output):
logsene config set --trace [true]
Simple search with tracing turned on:
logsene search
Supply timestamp to start the search from (returns log entries in the range whose lower bound is the timestamp and upper bound is not specified):
logsene search -t 2015-06-25T23:06:32
Search for documents that contain both terms, response and took.
Default operator is OR, which can be overridden with either -op AND or just –and:
logsene search response took -op AND
Search for documents that contain phrase ”triggered DYLD shared region” and were logged during the last 5 minutes.
logsene search “triggered DYLD shared region” -t 5m
Search for documents that were created between 9h ago and 8h 55m ago.
logsene search -t 9h/+5m
Search for documents that were created between 9h 5m ago and 9 h ago.
logsene search -t 9h/-5m
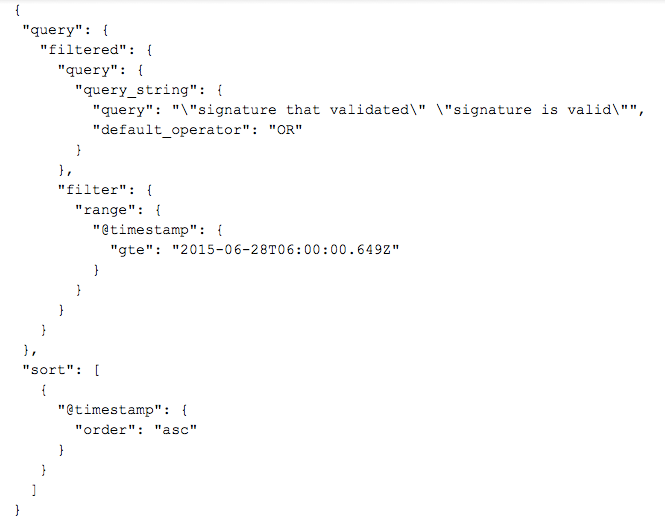
Search for documents that contain either or both phrases; that were created between last Sunday at 06:00 and now (morning is translated to 06:00). Return up to 300 results, instead of default 200.
logsene search "signature that validated" "signature is valid" -t "last Sunday morning" -s 300
Here’s how the previous request looks like as it’s being shipped to Logsene (after being translated by the elastic.js helper library):
Usage: logsene search [query] [OPTIONS]
where OPTIONS may be:
-q <query> Query string (-q parameter can be omitted)
-op AND OPTIONAL Overrides default OR operator between multiple terms in a query
-t <interval> OPTIONAL ISO 8601 datetime or duration or time range
-s <size> OPTIONAL Number of matches to return. Defaults to 200
-o <offset> OPTIONAL Number of matches to skip from the beginning. Defaults to 0
–json OPTIONAL Returns JSON instead of TSV
–sep OPTIONAL Sets the separator between two datetimes when specifying time range
Examples:
logsene search
returns last 1h of log entries
logsene search -q ERROR
returns last 1h of log entries that contain the term ERROR
logsene search UNDEFINED SEGFAULT
returns last 1h of log entries that have either of the terms
note: default operator is OR
logsene search SEGFAULT Segmentation -op AND
returns last 1h of log entries that have both terms
note: convenience parameter –and has the same effect
logsene search -q “Server not responding”
returns last 1h of log entries that contain the given phrase
logsene search “rare thing” -t 1y8M4d8h30m2s
returns all the log entries that contain the phrase “rare thing” reaching back to
1 year 8 months 4 days 8 hours 30 minutes and 2 seconds
note: when specifying duration, any datetime designator character can be omitted
(shown in the following two examples)
note: months must be specified with uppercase M (distinction from minutes)
note: minutes (m) are the default must be specified with uppercase M (distinction from minutes)
logsene search -t 1h30m
returns all the log entries from the last 1.5h
logsene search -t 90
equivalent to the previous example (default time unit is minute)
logsene search -t 2015-06-20T20:48
returns all the log entries that were logged after the provided datetime
note: allowed formats listed at the bottom of this help message
logsene search -t “2015-06-20 20:28”
returns all the log entries that were logged after the provided datetime
note: if a parameter contains spaces, it must be enclosed in quotes
logsene search -t 2015-06-16T22:27:41/2015-06-18T22:27:41
returns all the log entries that were logged between the two provided timestamps
note: date range must either contain forward slash between datetimes,
or a different range separator must be specified (shown in the next example)
logsene search -t “2015-06-16T22:27:41 TO 2015-06-18T22:27:41″ –sep ” TO “
same as previous command, except it sets the custom string separator that denotes a range
note: default separator is the forward slash (as per ISO-8601)
note: if a parameter contains spaces, it must be enclosed in quotes
logsene search -t “last Friday at 13/last Friday at 13:30”
it is also possible to use “human language” to designate datetime
note: it may be used only in place of datetime. Expressing range is not allowed
(e.g. “last friday between 12 and 14” is not allowed)
note: may yield unpredictable datetime values
logsene search -q ERROR -s 20
returns at most 20 latest log entries (within the last hour) with the term ERROR
logsene search ERROR -s 50 -o 20
returns chronologically sorted hits 21st to 71st (offset=20)
note: default sort order is ascending (for convenience – latest on the bottom)
logsene search –help
outputs this usage information
Allowed datetime formats:
YYYY[-]MM[-]DD[T][HH[:MM[:SS]]]
e.g.
‘YYYY-MM-DD’
‘YYYY-MM-DD HH:mm’
‘YYYY-MM-DDTHH:mm’
‘YYYYMMDD’
‘YYYY-MM-DD HHmm’
‘YYYYMMDD HH:mm’
‘YYYYMMDD HHmm’
‘YYYYMMDDHHmm’
‘YYYYMMDDHH:mm’
‘YYYY-MM-DDTHHmm’
‘YYYYMMDDTHH:mm’
‘YYYYMMDDTHHmm’
‘YYYYMMDDTHH:mm’
‘YYYY-MM-DD HH:mm:ss’
‘YYYY-MM-DD HHmmss’
‘YYYY-MM-DDTHH:mm:ss’
‘YYYY-MM-DDTHHmmss’
‘YYYYMMDDHHmmss’
‘YYYYMMDDTHHmmss’
note: to use UTC instead of local time, append Z to datetime
note: all datetime components are optional except date (YYYY, MM and DD)
If not specified, component defaults to its lowest possible value
note: date part may be separated from time by T (ISO-8601), space or nothing at all
Allowed duration format:
[Ny][NM][Nd][Nh][Nm][Ns]
e.g.
1y2M8d22h8m48s
note: uppercase M must be used for months, lowercase m for minutes
note: if only a number is specified, it defaults to minutes
Allowed range formats
range can be expressed in all datetime/duration combinations:
datetime/datetime
datetime/{+|-}duration
duration/{+|-}duration
duration/datetime
where / is default range separator string and + or – sign is duration designator
The following table shows how ranges are calculated, given the different input parameters
note: all allowable date/time formats are also permitted when specifying ranges
note: disallowed range separators:
Y, y, M, D, d, H, h, m, S, s, -, +, P, p, T, t
Allowed “human” formats:
10 minutes ago
yesterday at 12:30pm
last night (night becomes 19:00)
last month
last friday at 2pm
3 hours ago
2 weeks ago at 17
wednesday 2 weeks ago
2 months ago
last week saturday morning (morning becomes 06:00)
note: “human” format can be used instead of date-time
note: it is not possible to express duration with “human” format (e.g. “from 2 to 3 this morning”)
note: it is recommended to avoid human format, as it may yield unexpected results
Usage: logsene config set [OPTIONS]
where OPTIONS may be:
–api-key <apiKey>
–app-key <appKey>
–range-separator <sep>
–trace <true|false>
It is not necessary to explicitly set api-key nor app-key.
Logsene CLI will ask you to log in and choose Logsene application
if keys are missing from the configuration
Examples:
logsene config set –api-key 11111111-1111-1111-1111-111111111111
sets the api key for the current session
logsene config set –app-key 22222222-2222-2222-2222-222222222222
sets Logsene application key for the current session
logsene config set –range-separator TO
sets default separator of two datetimes for time ranges (default is /, as per ISO6801)
logsene config set –trace [true]
activates tracing for the current session (true can be omitted)
logsene config set –trace false
deactivates tracing for the current session
Usage: logsene config get [OPTION]
Where OPTION may be:
–api-key
–app-key
–app-name
–range-separator (used to separate two datetimes when specifying time range)
–trace
–all (return listing of all params from the current user’s session)
Fork, yeah!
So, you see, there’s no need to use grep on your logs any more. Once your logs are shipped and securely stored in Logsene (which happens in real-time), simply use its little cousin, Logsene CLI. No configuration, no rummaging through servers manually, over SSH.
You can try Logsene CLI even if you don’t already have a Sematext account.
Getting a free, 30-day trial account is as simple as it gets! You’ll be set in less than 15 minutes to start playing with Logsene CLI. We won’t ask you for your credit card information (it’s not needed for trial account, so why would we).
The source code can be found on GitHub.
Please ping us back with your impressions, comments, suggestions, … anything really. You can also reach us on Twitter @sematext. And we would be exceptionally glad if you filed an issue or submitted a pull request on GitHub.
